Table of Contents
On Windows 10, Timeline is an experience that debuts with the April 2018 Update, and it introduces a new way to resume activities you were working in the past, but it’s not a standalone feature. Instead, it’s an extension of Task View that allows you to see and resume a web page you were reading (using Microsoft Edge), finish working in a Word document, or pick up an app where you left off in addition to switching between running apps and work with virtual desktops.
Timeline works by tracking the stuff you do on your computer and then organizing them into a list within Task View. Using this feature, you can resume activities originated on the same or from another computer, or pick up documents you started on your Android or iOS device as long as they’re connected with the same Microsoft account.
Also, it integrates with Cortana, which means that you’ll see the digital assistant popping up now and then suggesting tasks you should continue, as such you might hardly need to lift a finger to resume a previous activity from other devices, including your phone.
In this Windows 10 guide, we’ll walk you through the steps to get started with Timeline on the April 2018 Update.
- How to navigate Timeline on Windows 10
- How to hide account activities in Timeline
- How to disable activity syncing in Timeline
- How to delete activity history in Timeline
- How to disable suggestions in Timeline
- How to disable Timeline completely on Windows 10
How to navigate Timeline on Windows 10
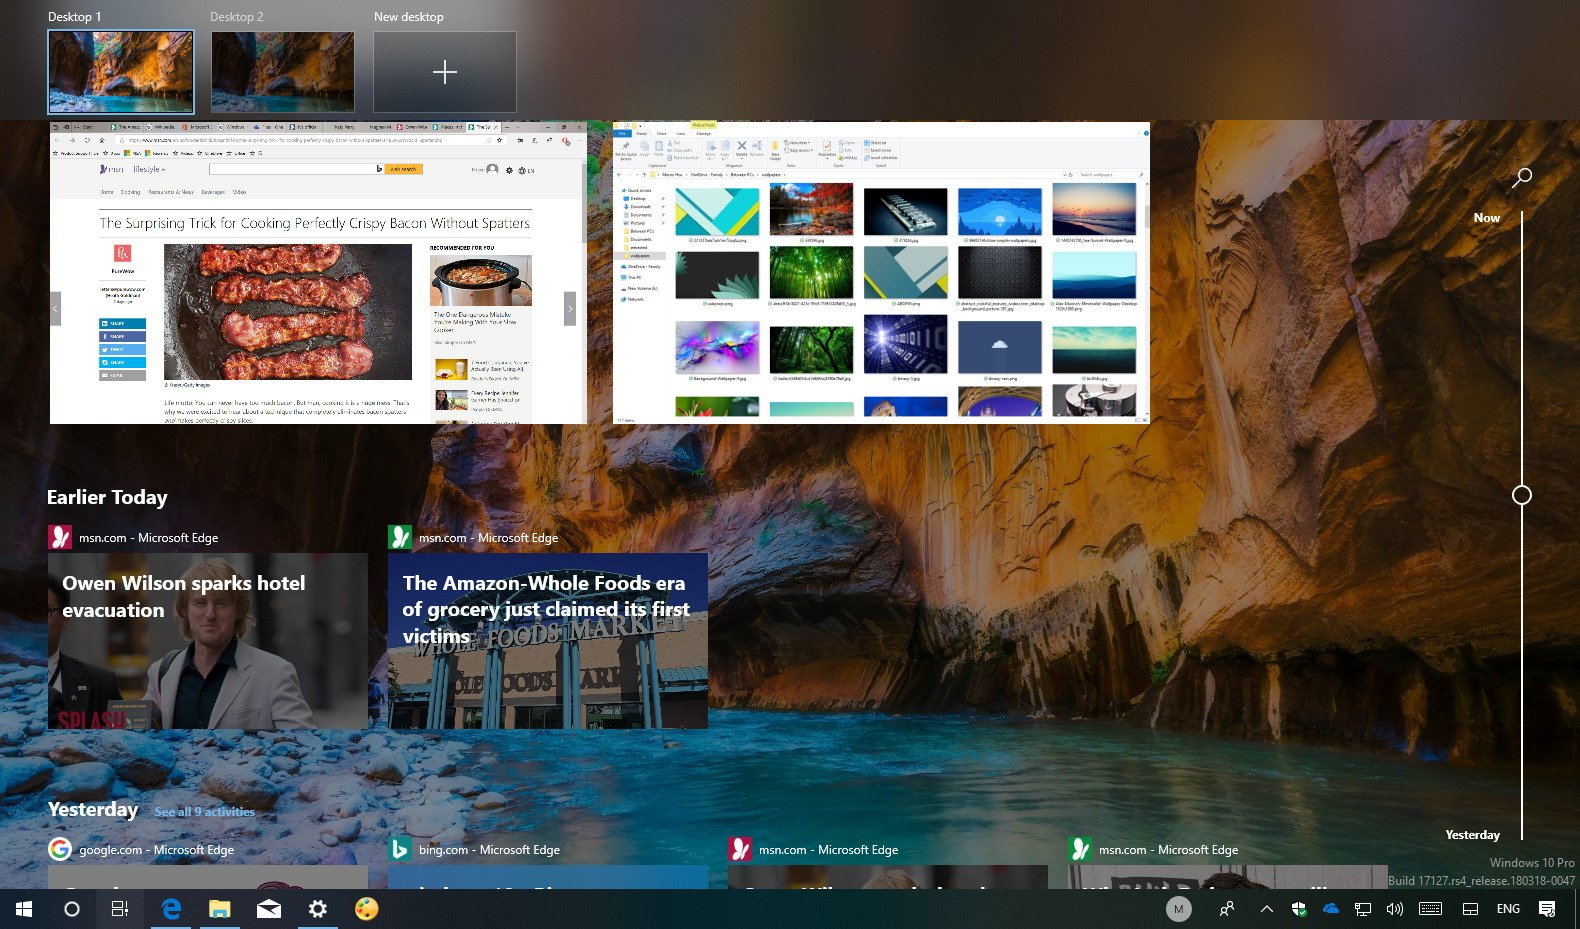
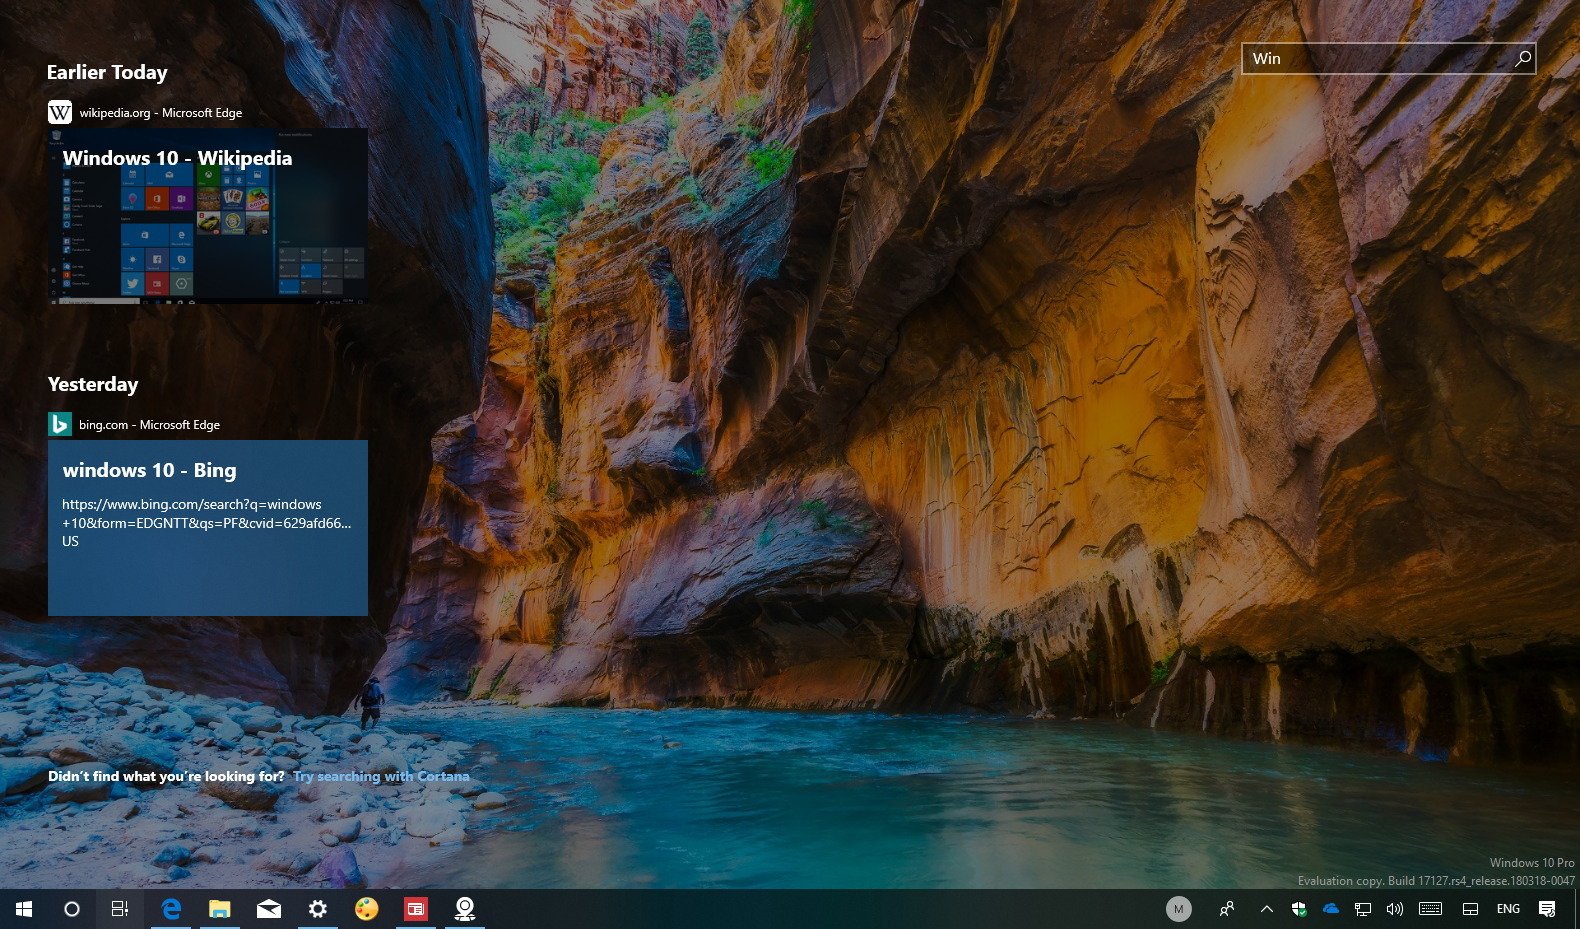
You can access the Timeline experience in at least two different ways. You can click the new Task View button in the taskbar, or you can use the Windows key + Tabkeyboard shortcut.
Once in Task View, you’ll find your Timeline activities below the list of your current running applications.
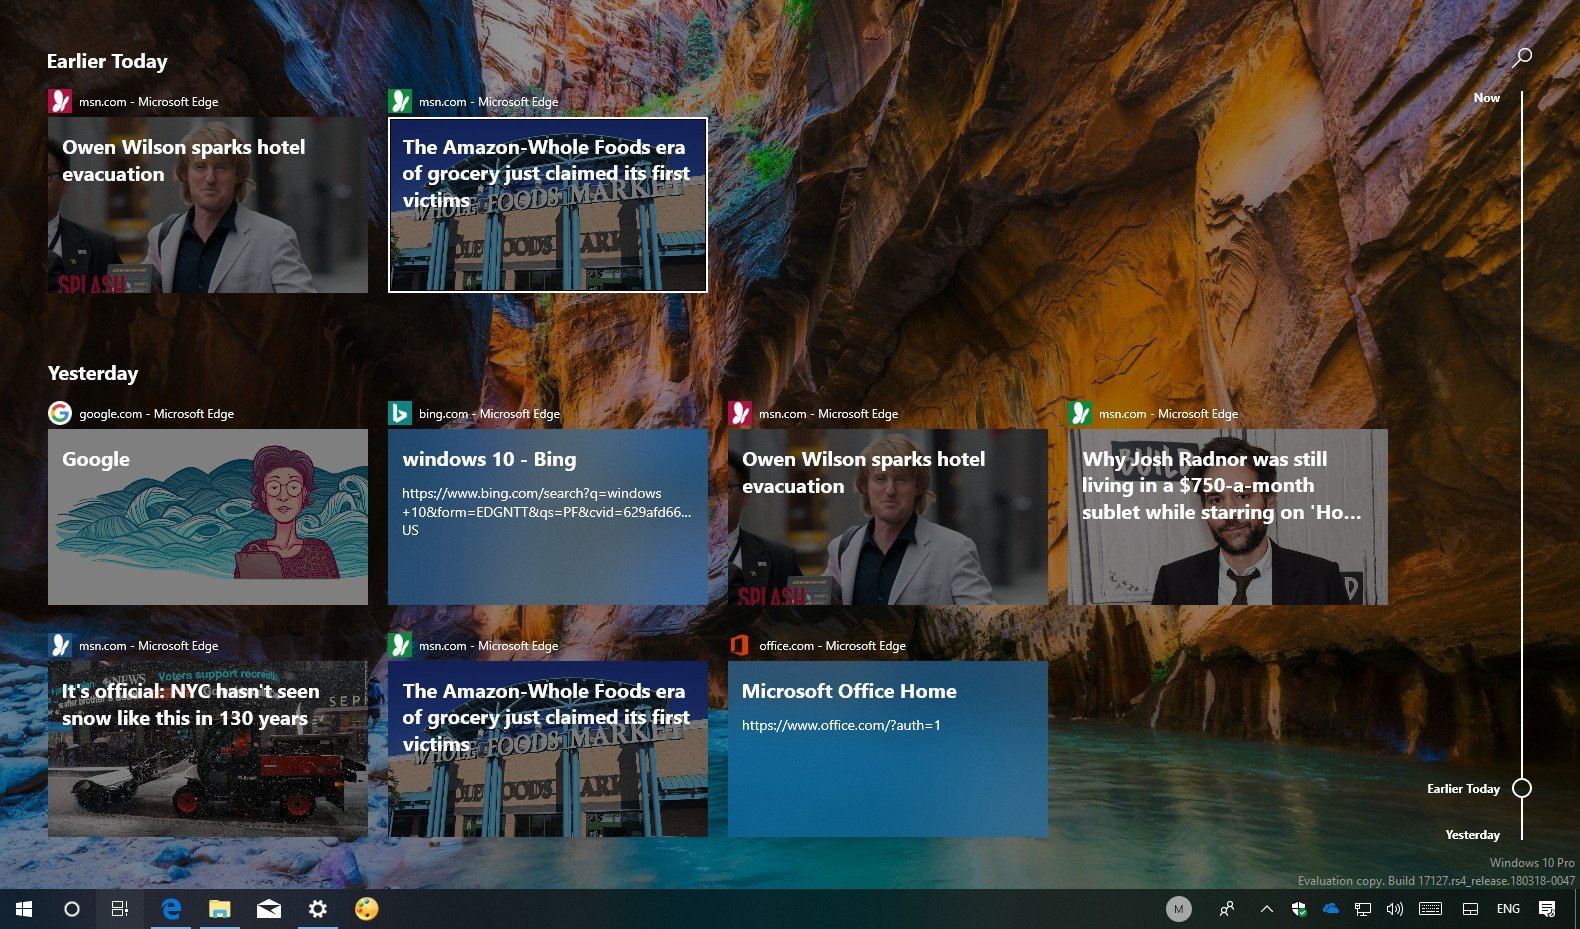
Task View organizes your timeline activities using links, but these are deep-links to a specific piece of content within an application, which makes it easier to pick up right where you left off.
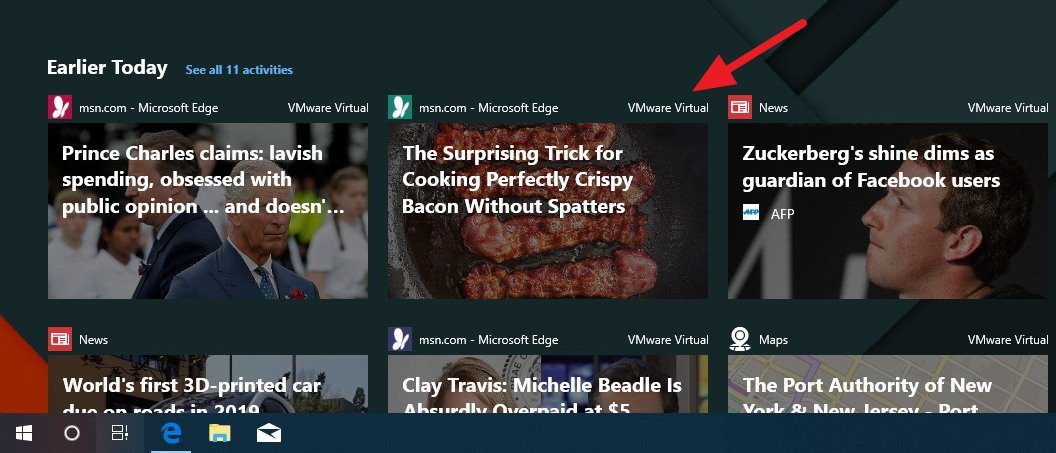
Items are sorted in chronological order and each day contains two rows of activities, but the number of links will depend on the size of your screen.
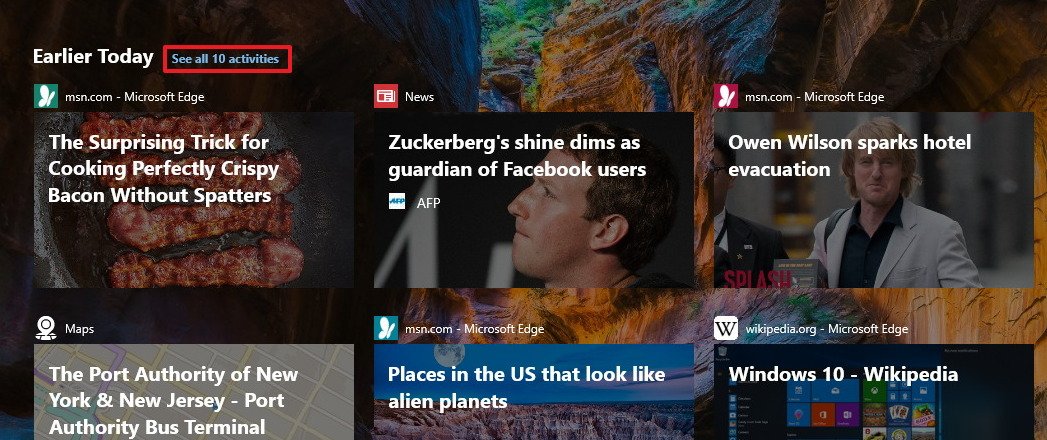
If you can’t see the task you want to resume, you can click the See all button in the header of the group to view that day activities organized by hours.
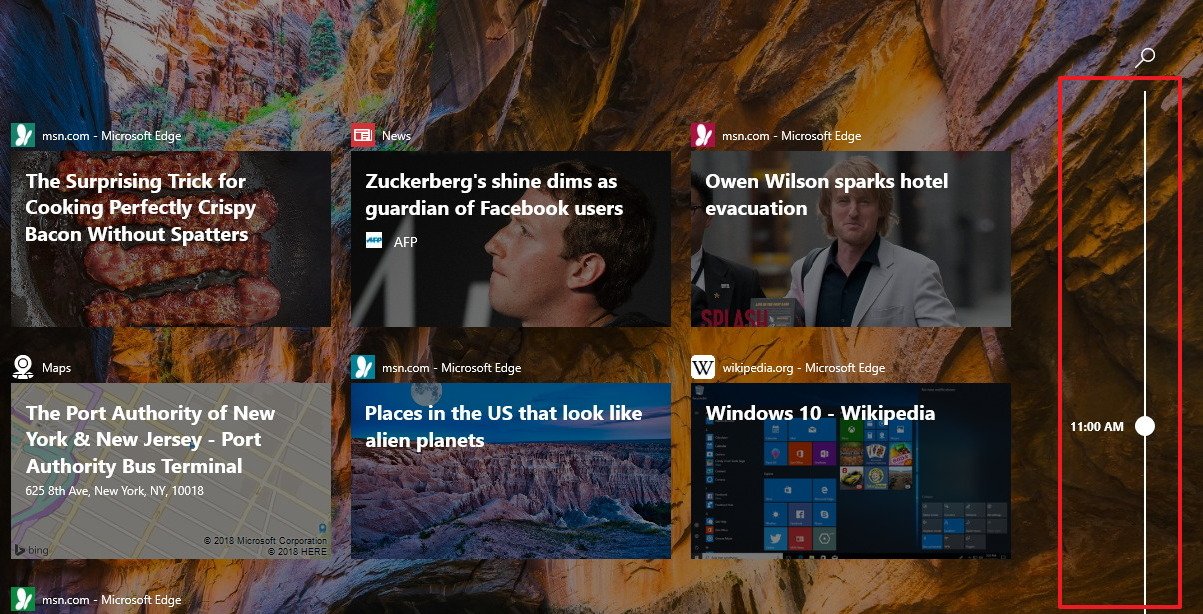
In the left side, there’s a convenient annotated scrollbar to quickly scroll through all the items. Also, on the top-left side, above the scrollbar, you’ll find an option that you can use to search an activity using keywords.
Although you can clear your activities using the Settings app, within Timeline, it’s possible to right-click an item to access a context menu with options to open or remove a particular task, or you can use the Clear all option to delete every activity for a specific day.
The cloud powers Timeline, so if you have more than one computer, you’ll see the same activities across all your devices using the same Microsoft account. (Activities from other devices will appear with a label in the upper-right corner indicating the name of the computer.)
Also, if the activity was started with a Microsoft Store app that isn’t available on the PC you want to resume the task, Windows 10 will guide you to get the app.
How to hide account activities in Timeline
Timeline can show activities from one or multiple accounts, including from your Microsoft and work accounts, but you can control which accounts activities appear in your timeline.
To show or hide accounts in your timeline, do the following:
- Open Settings.
- Click on Privacy.
- Click on Activity history.
- Under the “Show activities from accounts,” turn on or off the toggle switch to show or hide activities for your connected accounts.
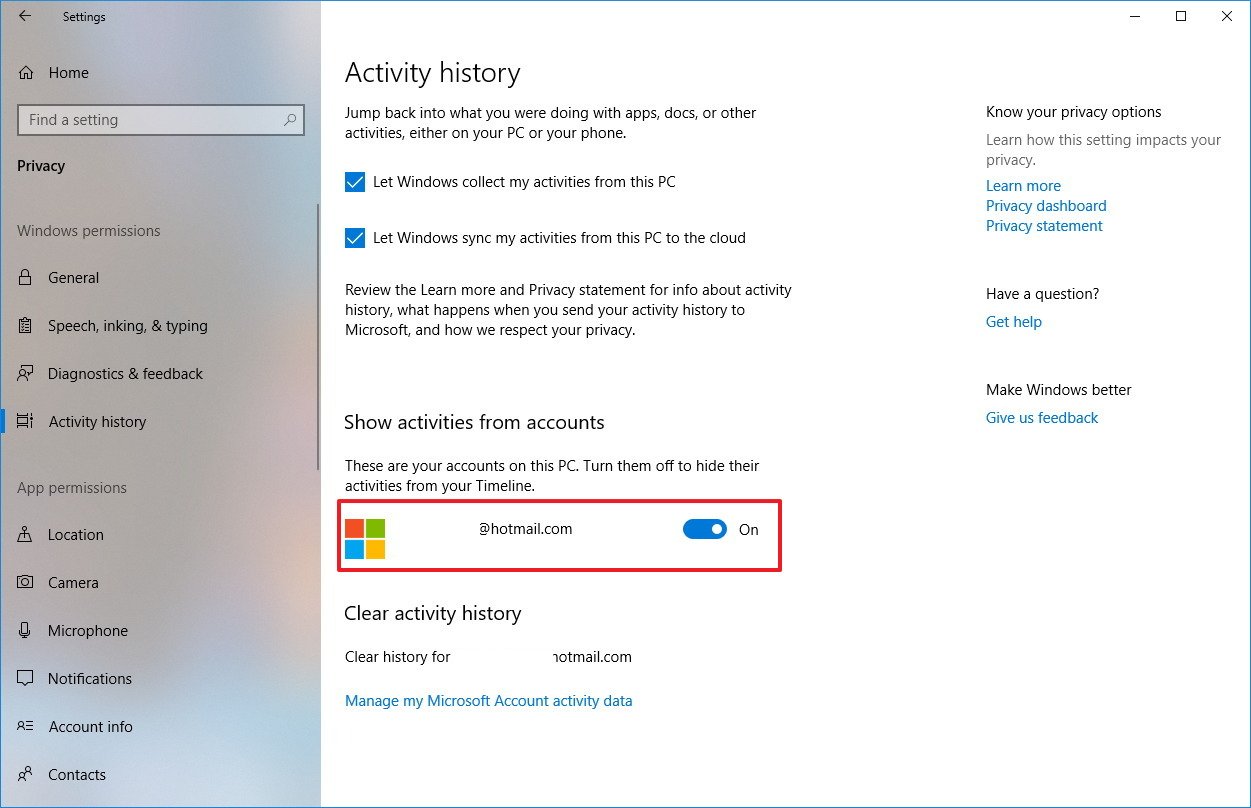
After completing the steps, activities associated with the account you’ve turned off will no longer show up in your timeline. However, the activities will still be available on other devices and in your account for up to 30 days.
How to disable activity syncing in Timeline
The basic idea with Timeline is to collect and make your activities available on all devices using the cloud as the medium to sync this information. However, to prevent privacy concerns, by default, Windows 10 doesn’t upload your activities to the cloud. Instead, it collects and shows only those tasks you’ve been working on your computer.
The caveat with this default behavior is that keeping the sync option disabled, it only shows up to four days of activities. If you want to resume tasks from other devices and go back as far as 30 days, you must enable the sync option.
To enable Timeline sync, do the following:
- Open Settings.
- Click on Privacy.
- Click on Activity history.
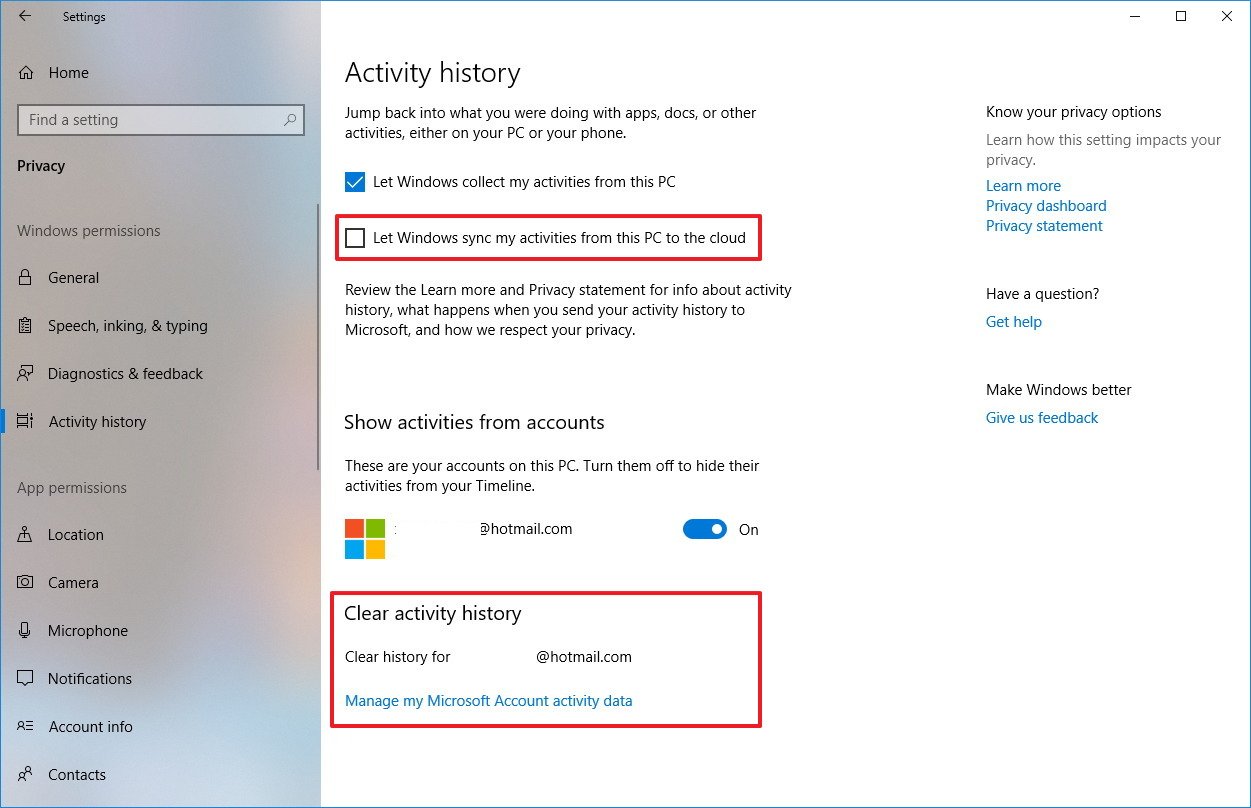
- Check the Let Windows sync my activities from this PC to the cloud option.
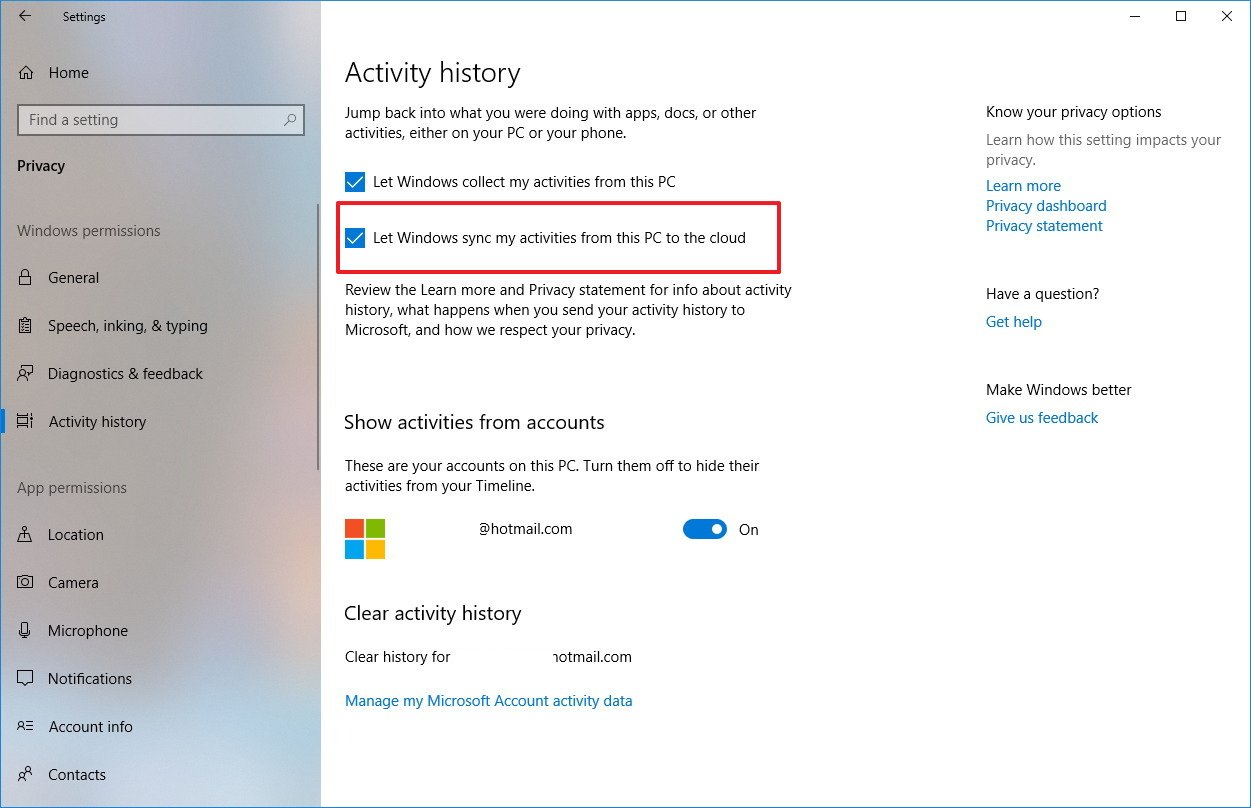
If you want to stop activities from syncing to the cloud, you can use the same instructions, but on step No. 4, make sure to clear the option.
How to delete activity history in Timeline
If your device has been collecting activities, but you don’t use Timeline, you can clear the activity history from your computer as well as from your Microsoft account.
To clear your timeline history, do the following:
- Open Settings.
- Click on Privacy.
- Click on Activity history.
- Clear the Let Windows sync my activities from this PC to the cloud option.
- Click on Diagnostic & feedback.
- Click on Activity history again. (It’s odd, but jumping to another page and coming back to the settings app is what enables the option to clear your activities after disabling the sync activities option.)
- Under “Clear activity history,” click the Clear button.
- Click the OK button to confirm.
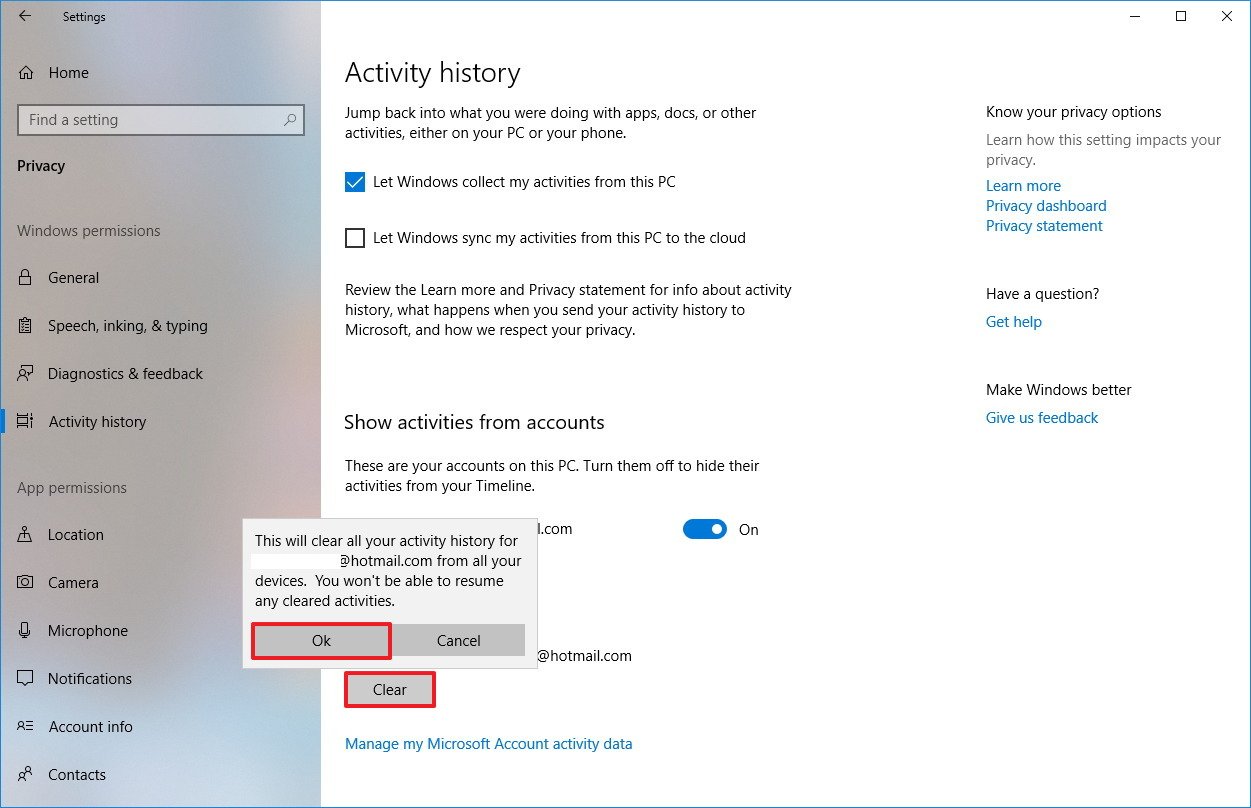
Once you’ve completed the steps, the activities from all the devices associated with your Microsoft account will be deleted along with the activities in your timeline.
If Timeline isn’t working correctly, you can use this option to delete your history to troubleshoot and fix issues with this feature.
You can also click the Manage my Microsoft Account activity data link to review and delete activities stored in the cloud.
Clearing only specific activities
If you only want to delete certain activities, you can do this using Task View.
- Open Task View.
- Scroll down and find the activity you want to remove.
- Right-click the activity, and select the Remove option to delete just the one activity or click the Clear all from option to delete activities for a given day.

How to disable suggestions in Timeline
Cortana also works with Timeline, and it’ll pop notifications suggesting previous activities that you should continue. If you’re not interested in receiving these type of notifications, do the following:
- Open Settings.
- Click on Cortana.
- Click on Cortana across my devices.
- Turn off the Help me pick up where I left off on other devices toggle switch.
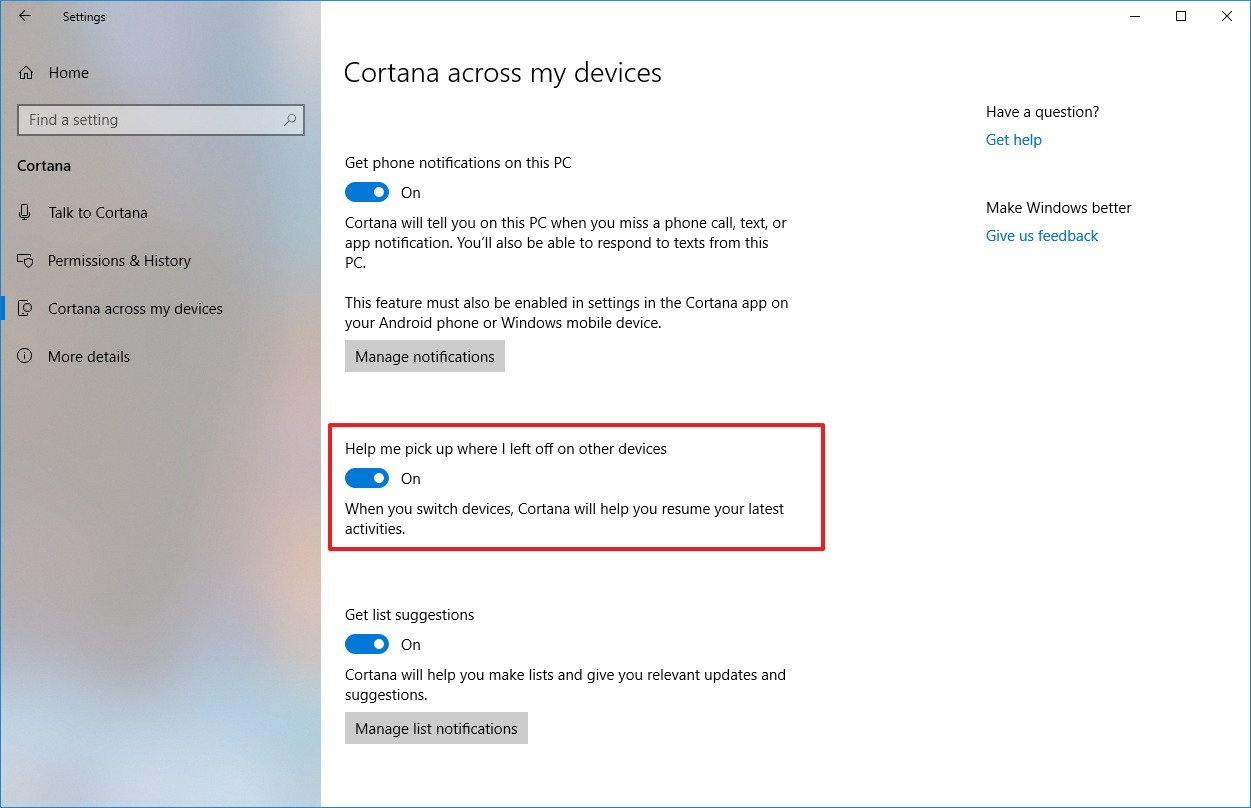
Also Timeline can occasionally show suggestions as well, but you can disable them using these steps:
- Open Settings.
- Click on System.
- Click on Multitasking.
- Under “Timeline,” turn on or off the Show suggestions occasionally in Timelinetoggle switch.

After completing the steps, you’ll no longer see Timeline suggestions on Windows 10.
How to disable Timeline completely on Windows 10
Timeline is a feature that comes enabled by default, but you can completely disable the experience if you don’t find a use for it.
Unfortunately, there’s not a “turn off Timeline” master switch. Instead, you need to follow a number of steps:
- Open Settings.
- Click on Privacy.
- Click on Activity history.
- Clear the Let Windows collect my activities from this PC option.
- Clear the Let Windows sync my activities from this PC to the cloud option.
- Under “Show activities from accounts,” turn off the toggle switch from all the accounts connected to your PC.
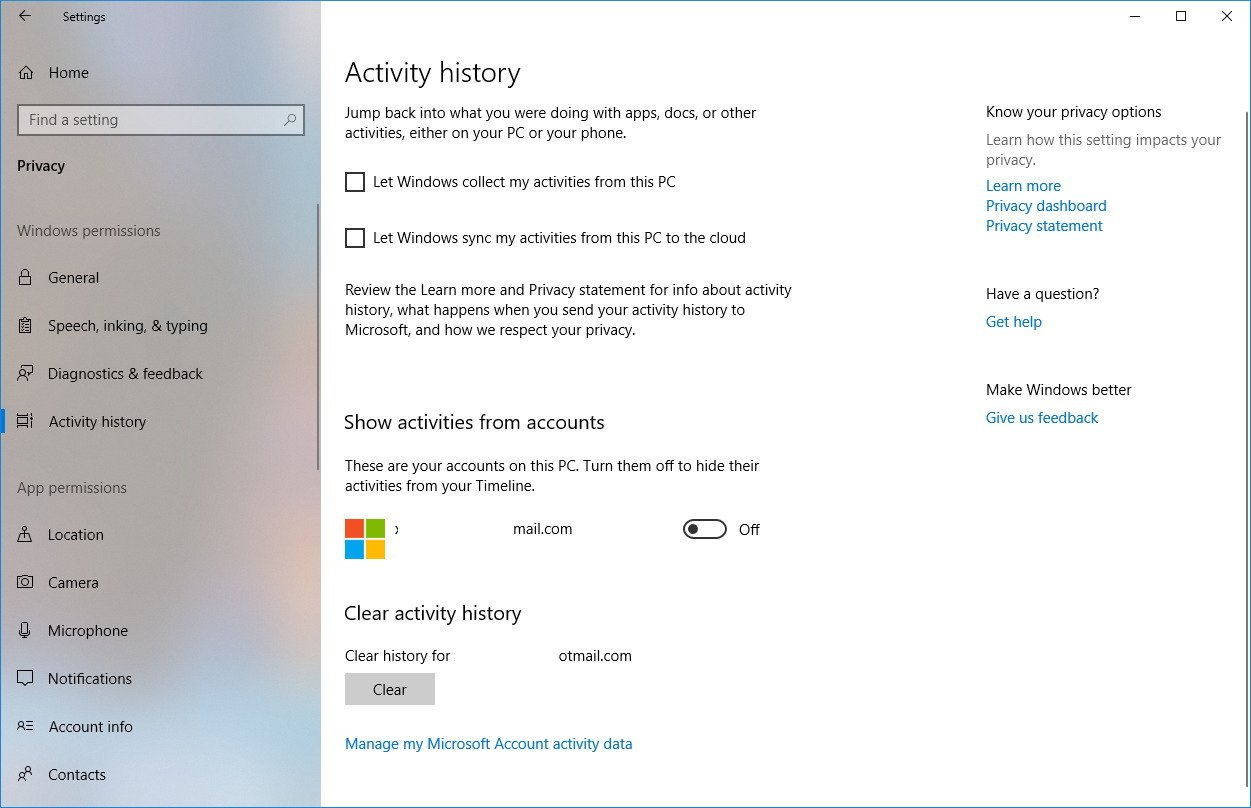
These steps will disable Timeline on your computer, but your previous activities will remain in your account for up to 30 days. If you want to remove tasks as well, use the instructions outlined above.
In the case that Timeline is disabled, you can enable the feature by making sure to turn on all the options described in the above steps.
Additional details about Timeline
Here’s some additional information you need to know as you get started with Timeline on Windows 10:
- Timeline works only on devices running the Windows 10 April 2018 Update and later.
- Timeline is a feature that works on every version of Windows 10 that is connected using a Microsoft account.
- Office applications will appear in your timeline, but after saving the document or if autosave is enabled.
- You can’t control which applications appear in your timeline.
- You can’t check your timeline on the web, but you can view your activities in the privacy dashboard of your Microsoft account.
- You can’t change the number of days that Timeline tracks on your devices. It’s either 4 days or 30 days if the sync option is enabled.
- Timeline is supported on a multi-monitor setup, but your timeline will only appear in the display you invoked it.
- Developers must implement the feature in their applications. However, if the app doesn’t support Timeline, and you open a file with it, Windows 10 will create a basic card to for that activity that works until the app gets updated with the new integration.


